
Table of Contents
Introduction & TL;DR
Salt water pools have become the default choice for thousands of US homeowners. They're quieter than traditional chlorine systems, require less frequent chemical balancing, and create softer water that's gentler on skin and eyes. But—and this is critical—salt water pools are not chlorine-free. They're chlorine generators.
Here's how it works: salt (NaCl) is electrolyzed into chlorine and sodium hydroxide inside the salt cell. You're essentially making your own chlorine on demand. This eliminates the need to buy and store large quantities of chlorine, but it introduces new maintenance requirements—primarily, keeping your salt cell clean and your pH in check.
Quick Facts: Salt water pools maintain 3,000–3,500 ppm of salt (10x less salty than seawater), generate 1–3 ppm free chlorine, and require cell inspection every 3–6 months. Conversion costs $1,000–$2,500; ongoing expenses are typically 30–50% lower than traditional chlorine pools.
How a Salt Chlorine Generator Works
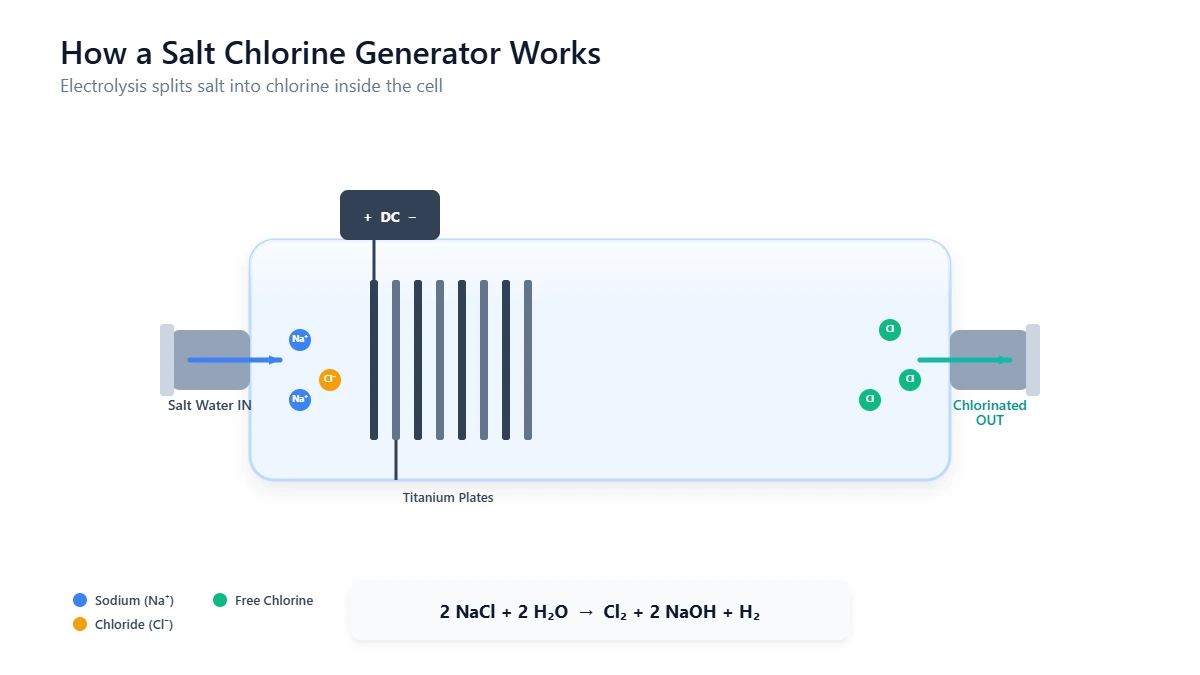
At the heart of every salt water pool system is the salt cell (also called a chlorinator or salt chlorine generator). This device performs one simple but elegant job: it converts dissolved salt into chlorine gas using electrolysis.
The Electrolysis Process
Water containing dissolved salt (NaCl) flows through the salt cell's electrode chamber. An electric current is applied, splitting the NaCl molecules. This produces chlorine gas (Cl₂), which dissolves into the pool water as hypochlorous acid (HOCl) and hypochlorite ion (OCl⁻)—the active sanitizers. It also produces sodium hydroxide (NaOH), which raises pH naturally, which is why salt pools tend toward alkalinity. The sodium chloride (NaCl) remains dissolved; the salt is recycled through the pool.
The process is reversible: over time, the chlorine oxidizes organic matter in the pool (sanitizing it), converts back to salt, and gets re-electrolyzed. This cycle repeats continuously while the salt cell is powered and water circulates through it.
Salt Cell Electrolysis Cycle
(3,000–3,500 ppm)
(1–3 ppm)
Salt cycles back into the pool. Chlorine sanitizes and oxidizes, then converts back to salt over time.
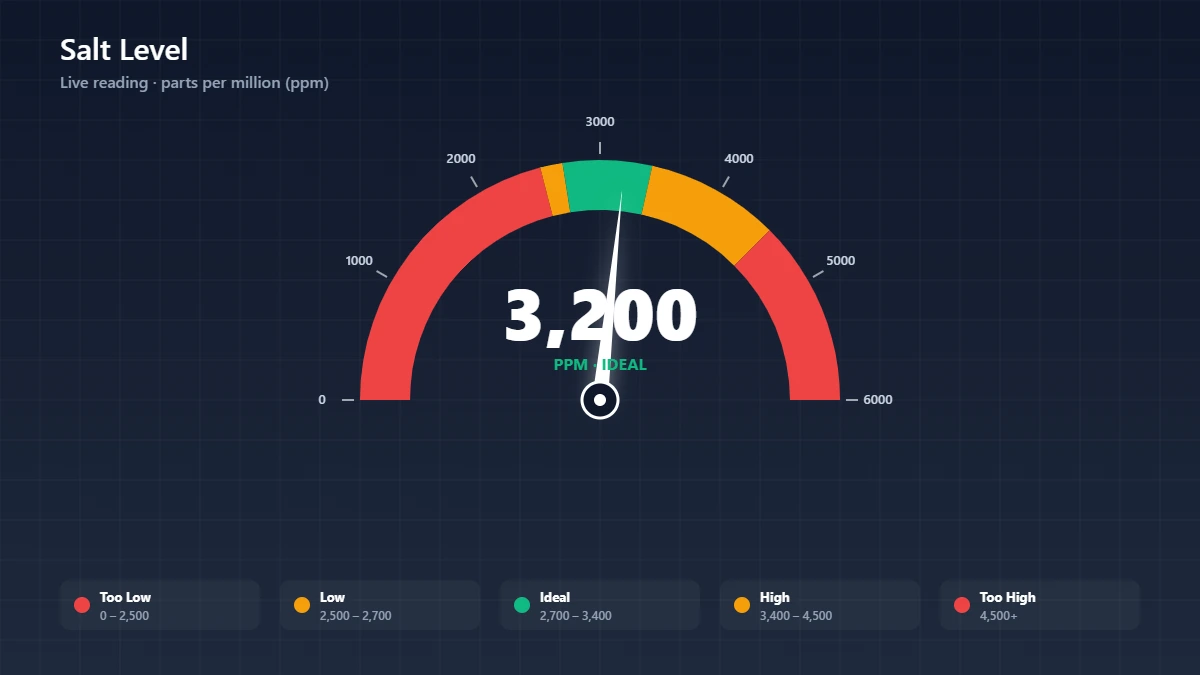
Ideal Salt Levels
Most salt cells operate efficiently at 3,000–3,500 ppm. This range balances chlorine output with salt efficiency. Below 2,700 ppm, the cell cannot produce enough chlorine and water will turn green. At 3,000–3,500 ppm you get maximum chlorine production and optimal cell efficiency. Above 4,000 ppm, excess salt may cause corrosion, mineral scaling, and metallic taste. Keep a reliable Hayward TurboCell Salt Cell maintained to ensure efficient operation. Use our salt calculator to determine exactly how much salt to add to reach your target level.
Always follow your manufacturer's recommendations. Hayward, Pentair, and Raypak systems may have slightly different optimal ranges.
Salt Water Chemistry Targets
Maintaining balanced chemistry is non-negotiable. Salt water pools follow the same fundamental chemistry as traditional chlorine pools, but with one key difference: pH drift. Because the salt cell generates sodium hydroxide as a byproduct, pH naturally rises over time. This is the #1 challenge for salt pool owners.
Salt (NaCl)
3,000–3,500 ppm
Free Chlorine
1–3 ppm
pH
7.2–7.6
Alkalinity
80–120 ppm
CYA (Cyanuric Acid)
60–80 ppm
Calcium Hardness
200–400 ppm
Why pH is Your #1 Challenge
The salt cell's generation of sodium hydroxide means pH naturally creeps upward. Left unchecked, high pH leads to reduced chlorine effectiveness (at pH 8.0, chlorine is only 25% effective), cloudy or hazy water, calcium scaling on pool surfaces and equipment, and reduced sanitization efficiency overall. Regular testing is essential—learn how to test your pool water properly to catch pH changes early.
Solution: Test pH every 2–3 days during the season. Use pH Down (Muriatic Acid) diluted at a 4:1 water-to-acid ratio (always add acid to water, never the reverse) to bring pH down. Some pool owners add acid weekly as preventative maintenance. This single task—managing pH—is more critical than any other maintenance routine in a salt water pool.
CYA Note: Higher Than Traditional Pools
Salt water pools benefit from slightly higher cyanuric acid (CYA) stabilizer—60–80 ppm vs. 30–50 ppm for traditional chlorine pools. Use a Cyanuric Acid (Stabilizer) product to protect the chlorine from UV degradation and reduce salt cell workload, extending cell lifespan significantly. If CYA gets too high and causes chlorine lock, use our chlorine lock calculator to determine how much water to drain to reset it.
Video Tutorial
Video: Salt Water Pool Care 101 — Swim University
This video from Swim University covers the fundamentals of salt water pool operation, including system components, chemistry balancing, and troubleshooting common issues. Highly recommended for visual learners.
The Weekly Maintenance Routine
Keeping your salt water pool in peak condition requires consistent weekly checks. This routine takes 20–30 minutes and prevents most common issues from developing into serious problems.
Daily Visual Check (2 minutes)
Each day, check your water clarity—it should be crystal clear. Cloudiness signals pH rise, algae, or a cell malfunction. Listen for unusual sounds from your pump and check the cell indicator light. Empty the skimmer basket of debris daily.
Weekly Testing (15 minutes)
Test your free chlorine (FC) weekly using test strips or a Taylor K-2006 Test Kit. Target 1–3 ppm. If below 1 ppm, increase salt cell runtime or add supplemental chlorine. When chlorine is very low, use our shock calculator to determine dosage. Test pH weekly—this is critical. Salt cells push pH upward constantly; expect pH to rise 0.1–0.2 units per week in warm weather. Target 7.2–7.6. Test alkalinity every two weeks (target: 80–120 ppm) to stabilize pH. Test salt level monthly using a salt test kit or digital meter. Target 3,000–3,500 ppm and add salt every 3–6 months. Test CYA monthly. Target 60–80 ppm.
Weekly Maintenance Tasks
Brush walls and floor 2–3 times per week, about 5 minutes each time, to prevent algae and maintain circulation. Run the pump 8–12 hours daily during peak season. Ensure water circulates through the salt cell for proper chlorine generation. Monitor your salt cell's light indicator—green means good condition, yellow indicates approaching maintenance window, and red signals your cell needs attention or replacement. Check equipment for no leaks, unusual corrosion, or strange odors. If you notice equipment issues, our equipment troubleshooter can help you diagnose problems quickly.
pH Alert: If pH rises above 7.8, add muriatic acid immediately. Don't wait. High pH causes calcium precipitation and algae growth rapidly.
Important: Salt does not evaporate — only water does. As water evaporates, your salt concentration actually increases. The only ways salt leaves your pool are splash-out, backwashing, and draining. Do not add salt just because your water level dropped. Always test salt level before adding more.
Monthly Deep Check
Once a month, test all six parameters (free chlorine, pH, total alkalinity, salt, CYA, and calcium hardness) to get a complete picture of your chemistry. Visually inspect your salt cell for white calcium buildup. Inspect pump seals and valve fittings for leaks. Verify your salt feeder (if you have one) is dispensing properly.
Your Salt System Info
Check your control panel or use a salt test strip
Months since cell was installed or replaced
Salt Cell Maintenance: The Critical Task
The salt cell is the heart of your system—and it requires proactive maintenance. Neglect it, and you'll face expensive replacement costs. Care for it properly, and it can last 5–7 years.
The Problem: Calcium Buildup
As water flows through the salt cell's electrode chamber, minerals (primarily calcium) precipitate and coat the electrodes. This buildup reduces chlorine output and eventually stops production entirely. You may notice low chlorine output where free chlorine drops below 1 ppm, the cell light turns yellow or red, white crusty deposits visible in the cell chamber, or control board error codes appearing.
Inspection Schedule
Every 3–6 months: Turn off the system and remove the salt cell (if yours is removable). Inspect the electrode plates. Clean shiny blue or gray plates need no action—just reinstall. Light calcium buildup with a thin white coating requires cleaning. Heavy buildup with thick white crust requires immediate cleaning.
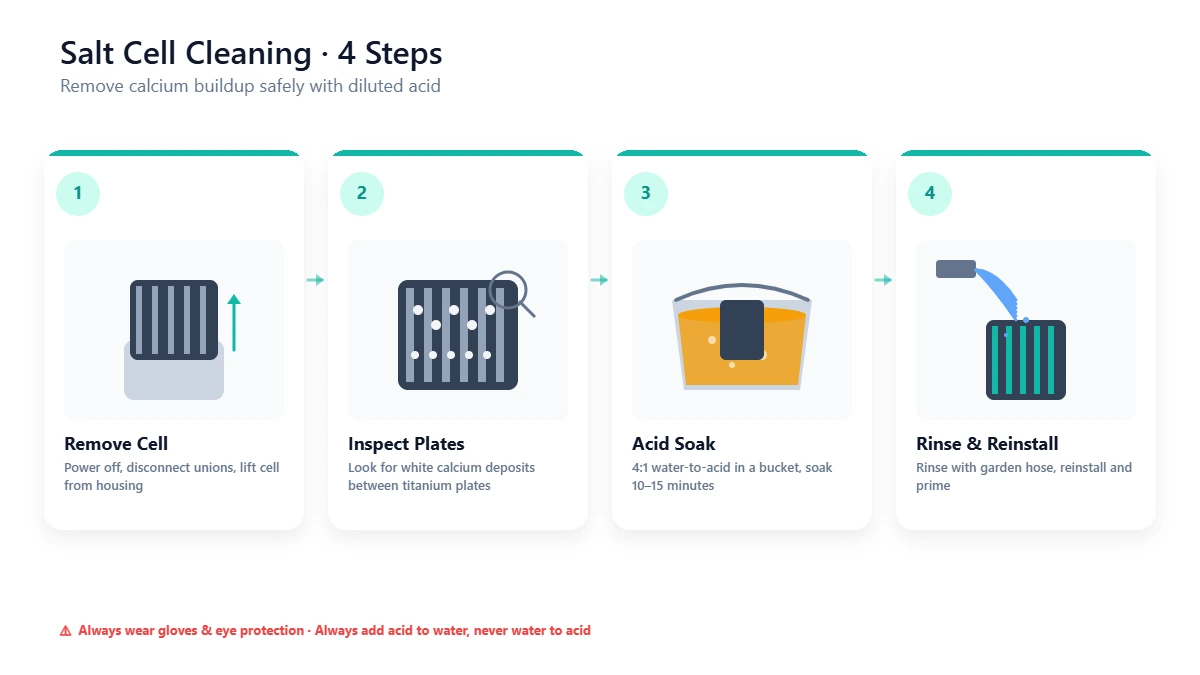
Cleaning the Salt Cell (DIY Method)
Safety Alert: Muriatic acid is highly corrosive. Wear gloves, eye protection, and work in a well-ventilated area. Never mix acid with bleach. Follow your manufacturer's cleaning instructions before using acid.
Turn off the salt cell and power down the control board. If removable, detach the salt cell from the plumbing—most modern cells have union fittings on each end. Prepare the cleaning solution by mixing Muriatic Acid at a 4:1 water-to-acid ratio (always add acid to water, never the reverse) in a large plastic bucket.
Submerge the cell in the solution for 15–30 minutes. The acid dissolves calcium deposits. You'll see fizzing and foam—this is normal. Remove the cell and rinse with fresh water until no acid smell remains. Use a soft brush (not metal) to gently scrub away remaining deposits. Dry the cell, reattach to plumbing, and power on. Test water immediately.
Alternative: Many manufacturers sell cleaning cartridges or allow professional cleaning service ($150–$300). If you're uncomfortable with acid, use this option.
Warranty Note: Check your manufacturer's warranty terms before acid cleaning. Some brands (particularly Hayward) may void the cell warranty if you use muriatic acid instead of their proprietary cleaning solution.
Salt Cell Lifespan & Replacement
Even with perfect maintenance, salt cells degrade over time. Electrodes gradually wear, and chlorine output eventually drops below usable levels. Expect a lifespan of 3–7 years depending on usage, water hardness, and maintenance. Replacement cells cost $300–$900 for the cell alone; installation adds $200–$500. Signs of failure include low chlorine output despite cleaning, control board won't power on, or physical cracks or damage to the cell housing. For more details on budgeting equipment replacement costs, see our pool maintenance cost guide.
Most manufacturers provide hour counters on their control boards. When you see 10,000+ hours of runtime, start budgeting for replacement.
Common Salt Water Pool Problems & Solutions
Salt water pools can develop issues quickly if ignored. Here are the seven most frequent problems and exact solutions.
1. Low Chlorine Output (FC Below 1 ppm)
Chlorine isn't keeping up with sanitization demands. Water may start to turn green or cloudy. Root causes include a dirty salt cell with white calcium buildup on electrodes (fix: clean the cell per the acid cleaning procedure), low salt level below 2,700 ppm (fix: add Pool Salt (40 lb Bag) using our dosage calculator), old salt cell 5+ years old with worn electrodes (fix: replace the cell), cold water below 60°F where salt cells slow down (fix: increase cell runtime manually or reduce usage until water warms), or low pH below 7.0 where chlorine is unstable (fix: raise pH to 7.2–7.6 using soda ash).
2. High pH (Above 7.8)
This is the #1 salt pool issue. pH creeps upward due to sodium hydroxide generation in the salt cell. Water becomes cloudy and chlorine effectiveness drops sharply. During electrolysis, the salt cell produces both chlorine (Cl₂) and sodium hydroxide (NaOH). Sodium hydroxide is strongly alkaline, raising pH continuously. In traditional chlorine pools, you're adding chlorine gas or hypochlorous acid, which lowers pH slightly. Salt pools lack this natural pH depression. Immediate fix: Add pH Down (Muriatic Acid) at a 4:1 water-to-acid ratio (always add acid to water, never the reverse). Test the pool hourly until pH drops to 7.4. Typical additions: 1–2 gallons per 10,000 gallons per week in peak season. Preventative fix: Add acid weekly during hot months as routine maintenance.
3. Salt Level Too Low
Test shows salt below 2,700 ppm. Chlorine output is insufficient; water turns cloudy or green. Causes include heavy rain diluting the pool, backwashing removing salt-saturated water, splashing during use, and normal evaporation concentrating minerals. To fix: calculate salt needed using (target ppm – current ppm) ÷ 1,000 × pool volume gallons = pounds needed. Use pool-grade salt only (99.8% NaCl, no additives) from brands like Diamond Crystal, Cargill, or Leslie's Essentials. Add salt to the pool deck near the skimmer. Run the pump for 24 hours to circulate and dissolve salt. Test salt level the next day and verify chlorine output is improving.
4. Salt Level Too High (Over 4,000 ppm)
Metallic or salty taste in water and white scaling on tile and surfaces indicate oversalting. Corrosion accelerates with high salt. Causes include over-adding salt, high mineral content in fill water, or evaporation concentrating salts. The only solution is partial dilution—draining and refilling with fresh water. Calculate drainage volume: (current ppm – target ppm) ÷ current ppm × pool volume gallons = gallons to drain. For example: (3,800 – 3,200) ppm ÷ 3,800 × 20,000 gallons = approximately 3,158 gallons to drain. Drain via the waste valve or sump pump, refill with fresh water, and test salt to verify it's in range (3,000–3,500 ppm).
5. Calcium Buildup on Salt Cell
Visible white crust inside the cell chamber (if removable) and low chlorine output despite good salt levels signal calcium scaling. Turn off the system and remove the cell if removable. Mix muriatic acid at a 4:1 water-to-acid ratio (always add acid to water, never the reverse). Soak for 15–30 minutes until deposits dissolve. Rinse thoroughly and reinstall. See the "Salt Cell Maintenance" section above for detailed cleaning instructions.
6. Metallic Taste in Water
Water tastes like pennies or has a copper/iron flavor, usually indicating high salinity or dissolved minerals. Check salt level: if above 4,000 ppm, dilute per the "Salt Level Too High" fix above. Check calcium hardness: if above 500 ppm, use a water softener cartridge or dilute. Check for metals like copper or iron from corrosion. Inspect the zinc anode (if present) and equipment for rust.
7. Corrosion on Metal Equipment & Concrete
Symptoms: White deposits on deck or coping, pitting on metal rails and ladders, green staining around fittings. Salt water is mildly corrosive at elevated levels. Solution: Keep salt below 3,500 ppm. Install a sacrificial zinc anode on the equipment pad to protect metal components. Use marine-grade stainless steel for any hardware in contact with pool water. Seal natural stone coping and decking annually with a penetrating sealer.
Natural stone coping — especially limestone, travertine, and sandstone — is particularly vulnerable to salt damage. Salt splash-out accelerates deterioration and can lead to costly replacement ($10,000+). If you have natural stone, seal it annually with a penetrating stone sealer and rinse the deck after heavy splash-out. Some stone types may not be suitable for salt water pool environments.
Salt Water vs. Traditional Chlorine: Full Comparison
Deciding between salt and traditional chlorine comes down to your priorities: convenience vs. simplicity, upfront cost vs. ongoing cost, and your willingness to manage pH aggressively.
| Factor | Salt Water | Traditional Chlorine |
|---|---|---|
| Water Feel | Softer, silkier | Standard |
| Chlorine Smell | Minimal | More noticeable |
| Chemical Handling | Minimal (salt 1-2x/year) | Regular (chlorine weekly) |
| Upfront Cost | $1,000-$2,500 | $0 additional |
| Annual Chemical Cost | $100-$200 | $300-$600 |
| pH Management | Critical (rises constantly) | Moderate |
| Equipment Wear | Higher corrosion risk | Standard |
| Ideal For | Convenience-focused owners | Budget-focused owners |
Neither system is objectively better. Salt water wins on daily convenience and water feel. Traditional chlorine wins on simplicity and lower upfront cost. Both produce the exact same sanitizer. For cost details, see our pool maintenance cost guide.
Converting to Salt Water
Converting an existing chlorine pool to salt water is straightforward and typically takes a weekend.
Conversion Checklist
Compatibility Note: Salt water is compatible with all pool surfaces (plaster, vinyl, fiberglass, pebble). Check your heater manufacturer warranty regarding salt water compatibility before converting.
Winterizing a Salt Water Pool
Salt water pools require the same winterization steps as traditional pools, plus a few salt-system-specific tasks.
Salt System Winter Steps
In spring, reinstall the cell, test salt (it does not evaporate over winter), and turn the system on when water reaches 60°F consistently. Use the salt system health dashboard above to check your system before the season.
Frequently Asked Questions
Is salt water the same as chlorine?
How salty is a salt water pool?
How long does a salt cell last?
Will salt water damage my pool equipment?
Can I convert back from salt to chlorine?
Thinking About Going Salt?
A Pro Can Size the Right System for Your Pool.
Salt cell sizing depends on pool volume, sun exposure, and bather load. A local professional can recommend the right generator, install it properly, and make sure your existing equipment is salt-compatible.
Related: Pool Maintenance Cost Guide · How to Test Pool Water